
Thanksgiving Table-Scape Decor
- Nov 12, 2018
- 4 min read
Need some quick and inexpensive ideas for your Thanksgiving table-scape? If so, keep reading to learn how to create this look in 3 easy steps! The table-scape below was created with almost all up-cycled or re-purposed items that I got from a thrift store, so it's both good for your wallet and the environment. Isn't that great!
Before you read on, if you like this post, you may also like my table-scape for Easter. Okay, here we go...
(This post may contain affiliate links)

Step 1: Create your centerpiece
Table runner: First, you'll need a burlap or similar table runner. I got this one at Home Goods, but you can find similar ones on Amazon or at Hobby Lobby. I just LOVE this farmhouse one from Amazon has a variety of colored grain sack stripes.
Pumpkins: Next you'll want to head over to Target to grab some of these little cloth and ceramic pumpkins from their dollar section or you can make up-cycled cloth ones yourself with this easy tutorial at Craft Buds. Aren't they adorable?
Silver Plated Dishes, water pitcher, platters and candlesticks: This is my favorite part! Now you'll want to head to the thrift store and grab yourself some silver-plated dishes, platters (for however many place settings you'll need), candle sticks and one water pitcher or something you can use as a vase. The more worn the patina, the better!
Candles: If you haven't gotten a set of these fabulous flickering LED candles, you absolutely must! There obviously much safe than real candles, and I love how real they look. You can use them for so many things! You can find them at Costco, and when they're on sale, they're only $20!
Eucalyptus Swag: I got mine at Target from the Magnolia Hearth and Home Collection. They now have one with pine-cones which you can get here. You can also get one here at Amazon.
Wheat Sprig: Finally, grab some wheat sprigs to put in your centerpiece water pitcher.
Now, pull it all together by putting your water pitcher and wheat in the center with the two candle sticks on the either side. Next, take the garland and weave it between the silver pieces. Finally, scatter the pumpkins and candles around the silver and garland.
Step 2: Set the Table
Chargers: Grab those silver platters and use them as chargers. Make sure you get
ones that are wider than your plates (about 12"-13"). Don't bother polishing them as the more weathered they look, the better!
Plates: Next set a plate on top of each platter. I bought some great melamine plates at Home Goods last year, but you can also get them here on Amazon. I LOVE these because they are very durable, light weight and they go with everything.
Napkins: Next, create some super cheap and easy napkin rings with paper towel cardboard tubes and ribbon. Just cut the tube to the same width as your ribbon, cut the ribbon to the same length as the circumference as the tube and then glue them together. You can add cute embellishments with buttons, twine or flowers. When done, insert your cloth napkins and set next to your plates.

Water Goblets: Once you're done with the plates, add your water goblets and wine glasses. Last year I found these great silver plate goblets at a garage sale. It's funny because when I looked them up on eBay, I nearly had a heart attack! It said they were worth over $2000! But.... (and it's a BIG but), then I found out they were silver plated and not real silver. Balloon burst! Oh well... I still love them! You can find ones just like mine here on eBay
Wine Glasses: Now, for the wine glasses! I made these from dollar store wine glasses and A Makers Studio gold leaf. The leaf comes in silver, gold, variegated bronze and bronze. I used the variegated bronze. All you need to do it apply the guilding size (adhesive) to the glass, let sit for 15 minutes while it come to tack and the press on the leaf. You can buy the size and leaf here.
Step 3: Take a Seat
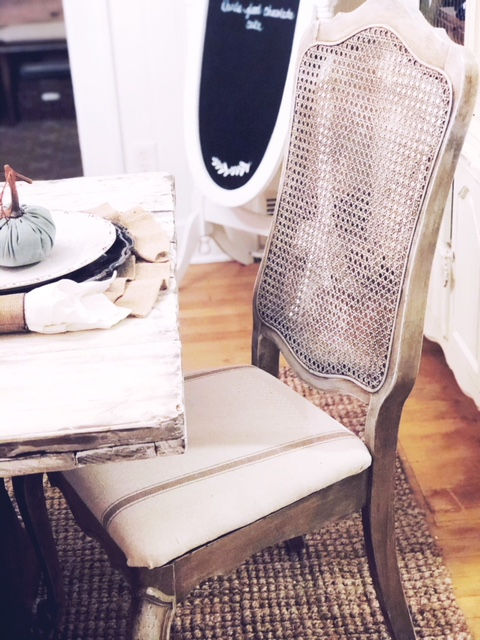
Now, technically, the chairs are not part of the table-scape, but I couldn't help but include them in this post because I love them so much!
I picked these chairs up at a garage sale last spring for about $20/piece. Wow! This week I changed out the seat cushions with new fabric, added some new paint and voila - brand new chair.
Paint the Chairs: To get this look, just paint the chairs in a light creamy color using a chalk style paint. I used Rescue Restore Paint paint in Biscuits and Gravy. I then painted on a thin layer of gray Milk paint. After it dried, I wiped it off with some dark tea water, leaving behind a great weathered patina. I finished the look with a little distressing and then sealed it with a Matter Sealer
Replace the Seat Covers: I finished the chairs by replacing the cover with this awesome grain sack fabric found here on Etsy. One yard will safely give you 2 chair covers. So super easy, huh?
And that's all folks! What do you think? Do you have questions? If so, please feel free to reach out at revivebyheidi@gmail.com. Also, while you're at it, you should sign up for my email newsletter here. By doing so, you'll be the first to get my tutorials, hear about sales and learn new tips and tricks. Facebook doesn't always show you all my post, so this way you'll be sure not to miss anything!
Thank for reading and have a wonderful Thanksgiving!
- Heidi


Comments